
Posted:12/02/2014 8:08PM
GIMP Plug-in: Script-Fu Batch NEF to JPEG
Mike Mclain shares his GIMP Plug-in to easily perform Batch NEF to JPEG conversion with the UFRAW application
Posted:12/02/2014 8:08PM
Mike Mclain shares his GIMP Plug-in to easily perform Batch NEF to JPEG conversion with the UFRAW application
Many years ago, (around circa 2009) back when I was a graduate Ph.D engineering student, I wrote a GIMP plug-in for my friend Jason (who was also a graduate Ph.D engineering student at the time) that would convert his digital cameras Nikon Electronic Format (NEF) images in to a more computer friendly Joint Photographic Experts Group (JPEG) image format.
Likewise, since I had never worked with the Nikon Electronic Format (NEF) image format nor had ever wrote a GIMP Script-Fu plug-in before, I figured this task would be a perfect opportunity to learn something new (and upon further reflection, the results obtained were, in fact, rather pleasing since I learned how GIMP plug-ins worked and created a rather nifty batch Nikon Electronic Format (NEF) image processing tool to share).
Note: screenshots presented, within this article, are done so under the fair use doctrine since their inclusion is strictly educational.
To begin, in order to get this plug-in working you will need a copy of the GNU Image Manipulation Program (GIMP) 2.6 or later which you can obtain Here.
Next, in order to open the NEF encoded images within GIMP, you will need to install the Unidentified Flying Raw (UFRaw) Application from Here or from the UFRaw homepage found Here.
Afterwords, you will need to download a copy of my NEF to JPG GIMP plug-in from Here and then unzip it into your GIMP script folder.
Now, for those of you who do not know where the GIMP plug-in folder is located at. The technical way to find your GIMP plug-in folder is to, first launch the GIMP application, next click "Edit" in the application tool bar, and finally click the Preferences option.
Likewise, once the preferences application panel has loaded, you will then need to click the Folders option icon (located at the bottom of the panels scrollable list on the left) and upon expanding this option (via clicking) you will then need to select the Scripts option.
Conversely, upon doing this step, you should now see a list of directories displayed where all the script files are currently located at and, if you are using windows vista, the default user scripts location (as in only your windows account can run this script) will likely be something like "C:\Users\(vista user name)\.gimp-2.6\scripts".
Alternatively, as long as you are using a Windows platform, I believe most GIMP installs will (by default) place all the core scripts in the "C:\Program Files\GIMP-2.0\share\gimp\2.0\scripts" folder or in the "C:\Program Files (x86)\GIMP-2.0\share\gimp\2.0\scripts" folder respectively (depending upon whether the GIMP installation was a 32 bit or a 64 bit installation, noting you can locate this path using the steps provided above) and successfully installing this plug-in into the core scripts folder will allow the script to be run on all user accounts.
Note: be sure to exit your copy of GIMP before installing this script!
Now, after you have copied the Script-Fu Batch NEF to JPG plug-in into your script folder, you will need to launch GIMP again and upon loading GIMP you should now see a menu option called Scripts appear on the main menu
Likewise, upon clicking the Scripts menu option, the NEF plugging, if installed correctly, will appear and upon clicking the NEF sub menu option, a list of 4 NEF plug-in options will appear (noting that each option is designed to fulfill a different NEF processing role depending upon your requirements).

The Batch NEF to Advanced JPG option runs a plug-in that allows you to convert a folder of NEF files to a custom defined JPEG format. Note: Such customizations include compression, quality, and a slew of other options to help reduce the image file size.
The Batch NEF to JPG option runs a plug-in that allows you to convert a folder of NEF files to a default high quality JPEG format that are loosely about half size of a NEF file. Note: This option is intended for the user who does not want to mess around with JPEG settings and is the quickest and easiest solution.
The NEF to Advanced JPG option runs a plug-in that allows you to convert a single NEF file to a custom defined JPEG format. Note: Such customizations includes compression, quality, and a slew of other options to help reduce file size.
The NEF to JPG option runs a plug in that allows you to convert a single NEF file to a default high quality JPEG format that is loosely about one half the normal NEF file size. Note: This option is intended for the user who does not want to mess around with JPEG format settings and is the quick and easy answer.
Additionally: The single file NEF plug-ins are predominantly designed for testing or configurational purposes only, thus allowing you to get the outputted JPEG format how you like it prior to performing a batch conversion.
The Batch NEF to Advanced JPEG plug-in option looks like this...
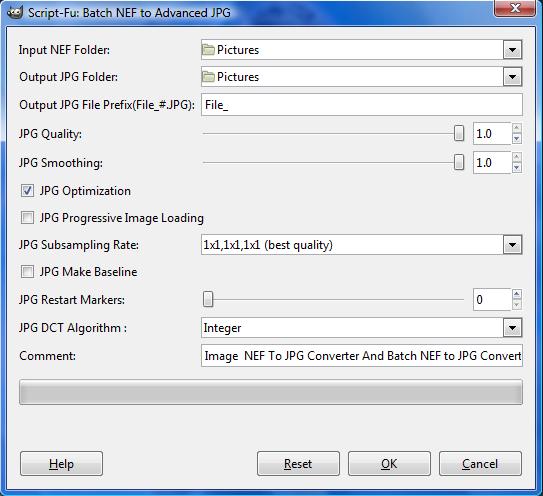
and the options are explained as follows...
Input NEF Folder is the folder where all your NEF files (that you want to have converted) are located.
Output JPG folder is the folder where all of your converted NEF files will be saved in JPEG Format.
Output JPG file Prefix is the name that your JPEG files are labeled as upon conversion. Note: for example if you have 4 NEF images in a folder and you type File_ as your output JPEG file prefix, the plug-in will save each of your NEF files, upon conversion, as: File_0.jpg, File_1.jpg, File_2.jpg, File_3.jpg, etcetera. Addendum: If you wanted your JPEG files to have the same name as your NEF file, I am afraid that this feature is not currently supported because, when I wrote this plug-in, my friend only wanted to label his images using a user defined prefix, since his camera produced a gibberish filename upon taking a picture; however, adding this feature (at least based upon my past experiences with GIMP scripting) should be a relatively straightforward task that, if you are programmatically inclined, you can implement yourself. Nevertheless, if enough requests are made to me regarding this particular feature, in the future, I might consider implementing it in the next plug-in release.
JPG Quality allows you to change the image quality (or exactness to the original NEF format) versus the outputted file size Note: as a general rule, larger files produce more accurate results, while smaller files produce less accurate results.
JPG Smoothing allows you to compensate for distortions that occur during the conversion process but will result in image blurring if taken to excess.
JPG Optimization toggles additional JPEG optimization techniques on or off. Note when on, the conversion process generally takes longer to perform but the JPEG file produced is typically smaller in size.
JPG Progressive Image loading is a encoding feature that allows some applications (like web browsers) the ability to quickly (though imprecisely) display parts of an image as it loads; however, I would advise setting this option off (unless you fully understand the consequences of using this feature) since a number of applications do not fully support progressive image loading and your JPEG might not load correctly if you use it.
JPG Sub Sampling Rate defines the image color sampling used during the JPEG encoding process and variation of this value will change the JPEG color quality versus the JPEG file size produced.
JPG Make Baseline toggles baseline color optimization on or off and while its usage can produce a slightly smaller JPEG file at a defined quality, this encoding method (like progressive image loading) is not fully supported within all applications, thus should only be used if you fully understand the consequences of using this feature else your JPEG might not load correctly.
JPG Restart Markers is a feature prominently utilized by web browsers to allow for the continuation of an image download and (like progressive image loading) is not fully supported within all applications, thus should only be used if you fully understand the consequences of using this feature else your JPEG might not load correctly.
JPG DCT Algorithm determines the color accuracy obtained during the conversion process. Float is more accurate but produces a larger file size, integer is the recommended setting, and fast integer yields a smaller file size but is less accurate.
Comment allows you to embed a comment into the JPG file which is not inherently visible.
Once you have selected your desired conversion options, click the OK button and go make a sandwich or watch some TV (assuming you have a lot of images to convert) because loading and converting the NEF image, into the JPEG format, is a rather time consuming task that takes around 30 seconds on an midrange computer.
Note: during the execution of this script, GIMP might say this application is no longer responding; however, it really is working correctly, so just leave it alone and let it run. Again, the conversion process does take some time to complete and I highly recommend that you multiply the number of files you wish to convert by 30 seconds in order to estimate the time it will take to complete the conversion process.
Warning: Do not close GIMP during the conversion process unless you want to start the NEF conversion over from scratch. This plug-in does not currently support resuming a conversion upon stopping, although it is possible to manually remove the NEF files from the specified conversion folder in order to emulate this particular feature.
The Batch NEF to JPEG plug-in option looks like this...
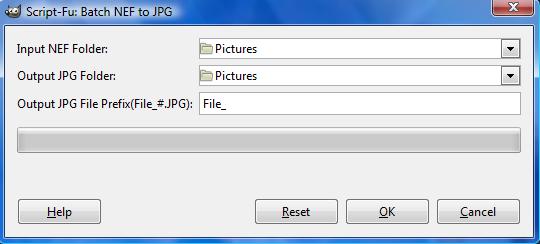
and the options are explained as follows...
Input NEF Folder is the folder where all your NEF files (that you want to have converted) are located.
Output JPG folder is the folder where all of your converted NEF files will be saved in JPEG Format.
Output JPG file Prefix is the name that your JPEG files are labeled as upon conversion. Note: for example if you have 4 NEF images in a folder and you type File_ as your output JPEG file prefix, the plug-in will save each of your NEF files, upon conversion, as: File_0.jpg, File_1.jpg, File_2.jpg, File_3.jpg, etcetera. Addendum: If you wanted your JPEG files to have the same name as your NEF file, I am afraid that this feature is not currently supported because, when I wrote this plug-in, my friend only wanted to label his images using a user defined prefix, since his camera produced a gibberish filename upon taking a picture; however, adding this feature (at least based upon my past experiences with GIMP scripting) should be a relatively straightforward task that, if you are programmatically inclined, you can implement yourself. Nevertheless, if enough requests are made to me regarding this particular feature, in the future, I might consider implementing it in the next plug-in release.
Once you have selected your desired conversion options, click the OK button and go make a sandwich or watch some TV (assuming you have a lot of images to convert) because loading and converting the NEF image, into the JPEG format, is a rather time consuming task that takes around 30 seconds on an midrange computer.
Note: during the execution of this script, GIMP might say this application is no longer responding; however, it really is working correctly, so just leave it alone and let it run. Again, the conversion process does take some time to complete and I highly recommend that you multiply the number of files you wish to convert by 30 seconds in order to estimate the time it will take to complete the conversion process.
Warning: Do not close GIMP during the conversion process unless you want to start the NEF conversion over from scratch. This plug-in does not currently support resuming a conversion upon stopping, although it is possible to manually remove the NEF files from the specified conversion folder in order to emulate this particular feature.
The NEF to Advanced JPEG plug-in option looks like this...

and the options are explained as follows...
Input NEF File is the folder where a NEF file (that you want to have converted) is located.
Output JPG folder is the folder where your converted NEF file will be saved in JPEG Format.
Output JPG file Name is the name that the JPEG file is labeled as upon conversion.
JPG Quality allows you to change the image quality (or exactness to the original NEF format) versus the outputted file size Note: as a general rule, larger files produce more accurate results, while smaller files produce less accurate results.
JPG Smoothing allows you to compensate for distortions that occur during the conversion process but will result in image blurring if taken to excess.
JPG Optimization toggles additional JPEG optimization techniques on or off. Note when on, the conversion process generally takes longer to perform but the JPEG file produced is typically smaller in size.
JPG Progressive Image loading is a encoding feature that allows some applications (like web browsers) the ability to quickly (though imprecisely) display parts of an image as it loads; however, I would advise setting this option off (unless you fully understand the consequences of using this feature) since a number of applications do not fully support progressive image loading and your JPEG might not load correctly if you use it.
JPG Sub Sampling Rate defines the image color sampling used during the JPEG encoding process and variation of this value will change the JPEG color quality versus the JPEG file size produced.
JPG Make Baseline toggles baseline color optimization on or off and while its usage can produce a slightly smaller JPEG file at a defined quality, this encoding method (like progressive image loading) is not fully supported within all applications, thus should only be used if you fully understand the consequences of using this feature else your JPEG might not load correctly.
JPG Restart Markers is a feature prominently utilized by web browsers to allow for the continuation of an image download and (like progressive image loading) is not fully supported within all applications, thus should only be used if you fully understand the consequences of using this feature else your JPEG might not load correctly.
JPG DCT Algorithm determines the color accuracy obtained during the conversion process. Float is more accurate but produces a larger file size, integer is the recommended setting, and fast integer yields a smaller file size but is less accurate.
Comment allows you to embed a comment into the JPG file which is not inherently visible.
Once you have selected your desired conversion options, click the OK button and go make a sandwich or watch some TV because loading and converting a NEF image, into the JPEG format, is a rather time consuming task that takes around 30 seconds on an midrange computer.
The NEF to Advanced JPEG plug-in option looks like this...
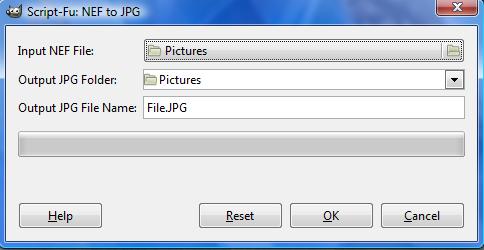
and the options are explained as follows...
Input NEF File is the folder where a NEF file (that you want to have converted) is located.
Output JPG folder is the folder where your converted NEF file will be saved in JPEG Format.
Output JPG file Name is the name that the JPEG file is labeled as upon conversion.
Once you have selected your desired conversion options, click the OK button and go make a sandwich or watch some TV because loading and converting a NEF image, into the JPEG format, is a rather time consuming task that takes around 30 seconds on an midrange computer.
Overall, while this particular plug-in is currently (if not permanently stuck) in beta development; however, this plug-in seems to work reasonably well (as my friend did not voice any complaints upon his usage of it) and, in turn, I hope it works reasonably well for you.
Enjoy!
By Mike Mclain