Posted:12/01/2014 6:08PM
Fixing the EPSON Print: Error - Printing, Network Printer Error.
Mike Mclain discusses one possible fix to the EPSON Print: Error - Printing, while using a EPSON workforce network printer.
Posted:12/01/2014 6:08PM
Mike Mclain discusses one possible fix to the EPSON Print: Error - Printing, while using a EPSON workforce network printer.
A few weeks ago (circa November 11) I wrote an article discussing a possible solution to the EPSON Scan: Cannot Communicate with the scanner... Error that I encountered. Conversely, Lady Fortuna decided to bestow upon me (this week) the inverse and equally unique problem (a sudden inability to print) thus I now find myself writing an article covering one possible solution to the EPSON Print: Error - Printing error I encountered.
Now, before I start discussing my solution to this particular problem, allow me to provide a brief disclaimer:
First, it is important to recognize that this particular error message is inherently (if not intentionally) a metaphoric turkey shoot, insofar as such messages are inherently generic by design and the number of problems that can ultimately produce such errors are extremely vast. Likewise, with this being said, I highly recommend that you review the differential paragraph (provided below) and determine if the symptoms discussed match the ones you have encountered (noting that, if they do not, the solution to your particular variation of this error likely exist elsewhere on the Internet).
Second, given the diverse occurrence of this particular problem (since printers are practically a household item), I attempted to make this article as broad as possible in order to make it more palatable to an assortment of technical backgrounds. Conversely, as a result of this objective, I have incorporated a number of screenshots into this article (since a picture is typically worth a 1000 words) and I would like to briefly mention that these screenshots are being presented, within this article, under the fair use doctrine since their inclusion is strictly educational.
Now, with the preface out-of-the-way, allow me to begin providing a brief overview of my current hardware configuration. I currently own four network printers:
that are connected to a mid range overclockable Intel i5 Windows 7 computer with 16 gigabytes of memory via wireless LAN using a new ASUS RTAC68R router. While such hardware configurations are slightly atypical to the average at-home consumer (predominantly because my doctoral research necessitated a rather beefy computer and I have a substantial amount of family pictures I am currently digitizing); however, my ability to print via the A EPSON Workforce 2540 or the A EPSON Workforce 3530 was working perfectly until I decided to upgrade my D-LINK DIR-615 router to a ASUS RTAC68R router.
Conversely, while it might be tempting to simply associate the print errors encountered with a misconfiguration of either the EPSON printer or ASUS router (I am also not ruling out a stealth windows update here either); however, (upon ensuring everything was configured correctly) I discovered that I was able to scan images from both the A EPSON Workforce 3530 and A EPSON Workforce 2540 but was still unable to print to either device (noting that such observations supported the notion that the hardware was configured correctly). Likewise, further testing revealed that I was able to print to the A Cannon PIXMA MG5522 and this attribute further supported the notion that the hardware was configured correctly while (at the same time) intuitively indicated that the problem was likely software in nature.
Now, to visually demonstrate the manifestation of this particular problem, consider the following scenario in which a simplistic text file was printed to a EPSON printer (in my case, the printer selected was the "WF-3530 Series(Network)") and the printer queue icon, found the lower right hand corner taskbar area, was clicked:

until the printer queue application appears and (upon further examination of this particular window) reveals that a printing error:

has occurred. Likewise, (upon examining such errors in greater detail) it becomes apparent that little to no information (surrounding this particular error's occurrence) is readily available and such attributes accurately describe the innate difficulties encountered when trying to solve this particular problem, since the standard solutions (like reinstalling the EPSON drivers, using the Windows troubleshooter, etcetera) do not resolve this problem; however, the odd port descriptor (in this case "EP068E7A:WF-3530 SERIES") does provide a small clue if you know what your looking for.
Conversely, after spending a substantial amount of time investigating this particular issue, I came up with the following solution...
First, the queued print job that failed, needs to be canceled by right clicking it within the Printer Queue application:
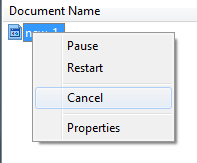
and then selecting the cancel sub-menu option.
Likewise, upon selection of the cancel sub-menu option, a dialog will appear:
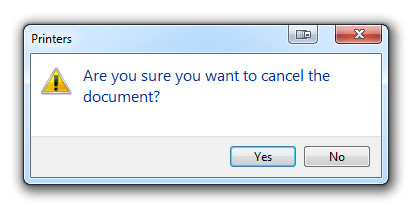
asking you to confirm this action (press yes to confirm) and (if everything goes according to plan) the status of the selected print job should change to:

which indicates that the print job is (hopefully) being removed from the windows print spooler (noting that this removal process can sometimes take around a minute, and should it fail to complete you will have to Google print spooler removal for further assistance.
Additionally, if you have multiple failed documents listed within your print queue, you will need to repeat the previous steps until the print queue is empty, also (as a word of caution) if you have more than one printer installed (like me) you need to ensure that the print queue window open is (in fact) the correct printer queue, since each printer has its own print queue and this can be done via the "Device and Printers control panel window -> right click -> See whats printing sub-menu option".
Conversely, once the print spooler -(or print queue) is free of pending documents, the next step is to examine the Device and Printers control panel window by clicking (at least in Windows 7) the start button in the lower left-hand corner:

and then selecting the Device and Printers option on the (Windows 7) start menu (noting that non Windows 7 users will likely have to venture into the windows control panel in order to find their equivalent of the Device and Printers window).

Likewise, examination of the Device and Printers Option window should reveal a icon (or installed printer) similar to:
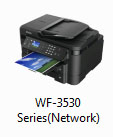
noting that should a icon or installed printer similar to:
appear in the window (while not being selected as the default printer) then an attempt should be made to select this particular printer as the default printer and another test page printed for reasons that will be discussed in a moment.
Conversely, to elaborate on this observation further, it is important to recognize that there is a distinction between the EPSON "(Network)" and "(WF-3530 Series)" printer postfix, since the "(Network)" printer postfix generally implies the usage of the EpsonNet port while the "(WF-3530 Series)" printer postfix generally implies the usage of the Web Services for Devices (WSD) port and (as you might have already guessed) the WSD port configuration has a tendency to correctly work (since it is independent of the EpsonNet port and is windows supported) while the EpsonNet Port configuration (at least in my particular case) was somehow configured incorrectly and thus created the observed printer issues.
Now, upon surmising all of this techno mumbo-jumbo, if (at this point) you have a printer icon with a WSD postfix (like "WF-3530 Series") that is not selected as the default printer. You should be able to fix your printing problems by selecting this printer (via the "right-click -> Set as Default Printer" sub-menu option) since this WSD printer configuration should be able to communicate with the printer, otherwise (if not) your problem is likely windows related and extends beyond the issues covered within this article since WSD issues are involved.
Likewise, if you do not have any WSD postfixes shown (or you want to try to fix an existing WSD issue) a simplistic method of automatically generating them from your existing EpsonNet configuration exists and a tutorial (albeit its more of a hack) is available compliments of Mike Thomsons Blog) noting that this method should get your printer up and running again via the WSD configuration; however, it will not fix the underlying EpsonNet configuration problem if you desire to use the "(Network)" printer adapter.
Nevertheless, if you decide to fix the underlying EpsonNet configuration problem, the first step in correcting this issue is to select the:
"(Network)" postfix printer icon, and then right-click this icon:

such that the printers property sub-menu option appears and can be selected.
Likewise, upon opening the printers property window, the ports tab needs to be selected via left clicking:
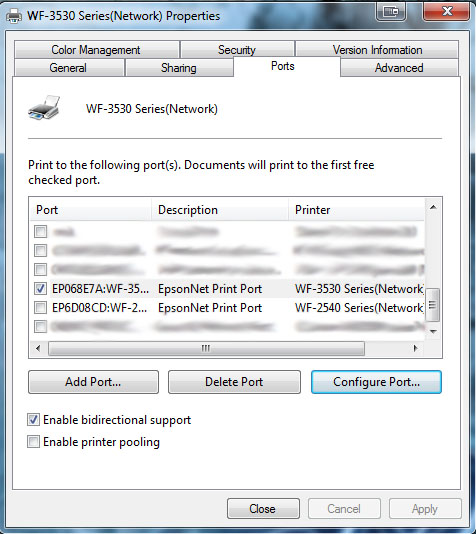
and a new port will need to be added by clicking the:

add port button.
Conversely, upon clicking the add port button, the Printer Ports Dialog will appear:

and the EpsonNet Print Port option should be selected (via left clicking) and the New Port button pressed (via left clicking).
Similarly, upon pressing the New Port button, the Add EpsonNet Print Port Wizard dialog will appear:
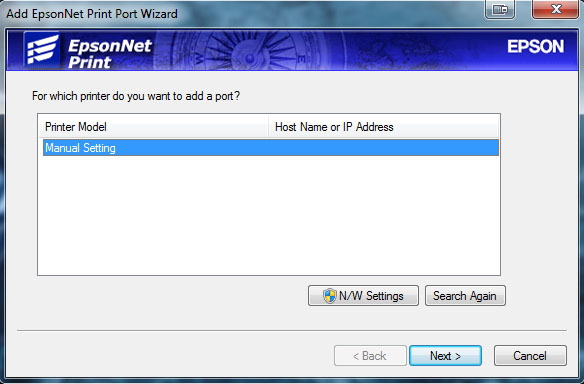
and the manual settings option should be selected (via left clicking) and the next button pressed (via left clicking).
Likewise, upon pressing the next button, the second Add EpsonNet Print Port Wizard dialog:

will appear and (at this point) the printers LAN information is required in order to map the EpsonNet configuration to a printer on the network. While there are a number of ways this information can be obtained, some methods (like host name) might be more robust than others; nevertheless, in my solution I did the following.
First, because I frequently administrate a number of routers and network devices (an attribute that makes the memorization of local LAN IPs rather difficult), I quickly opened a Windows console via the start menu:

and, upon opening the console application, I utilize the IP configuration command (via typing ipconfig) in order to obtain some basic information about my local LAN network, as shown here:

noting that this particular step was predominantly geared for rudimentary at home networks. Likewise, I was able to quickly determine my routers administrative LAN address was "192.168.1.1" upon examining "the Default Gateway returned by the ipconfig command (noting that this value changed when I installed a new router).
Likewise, upon entering this address into my web browser (Mozilla Firefox in my particular case):
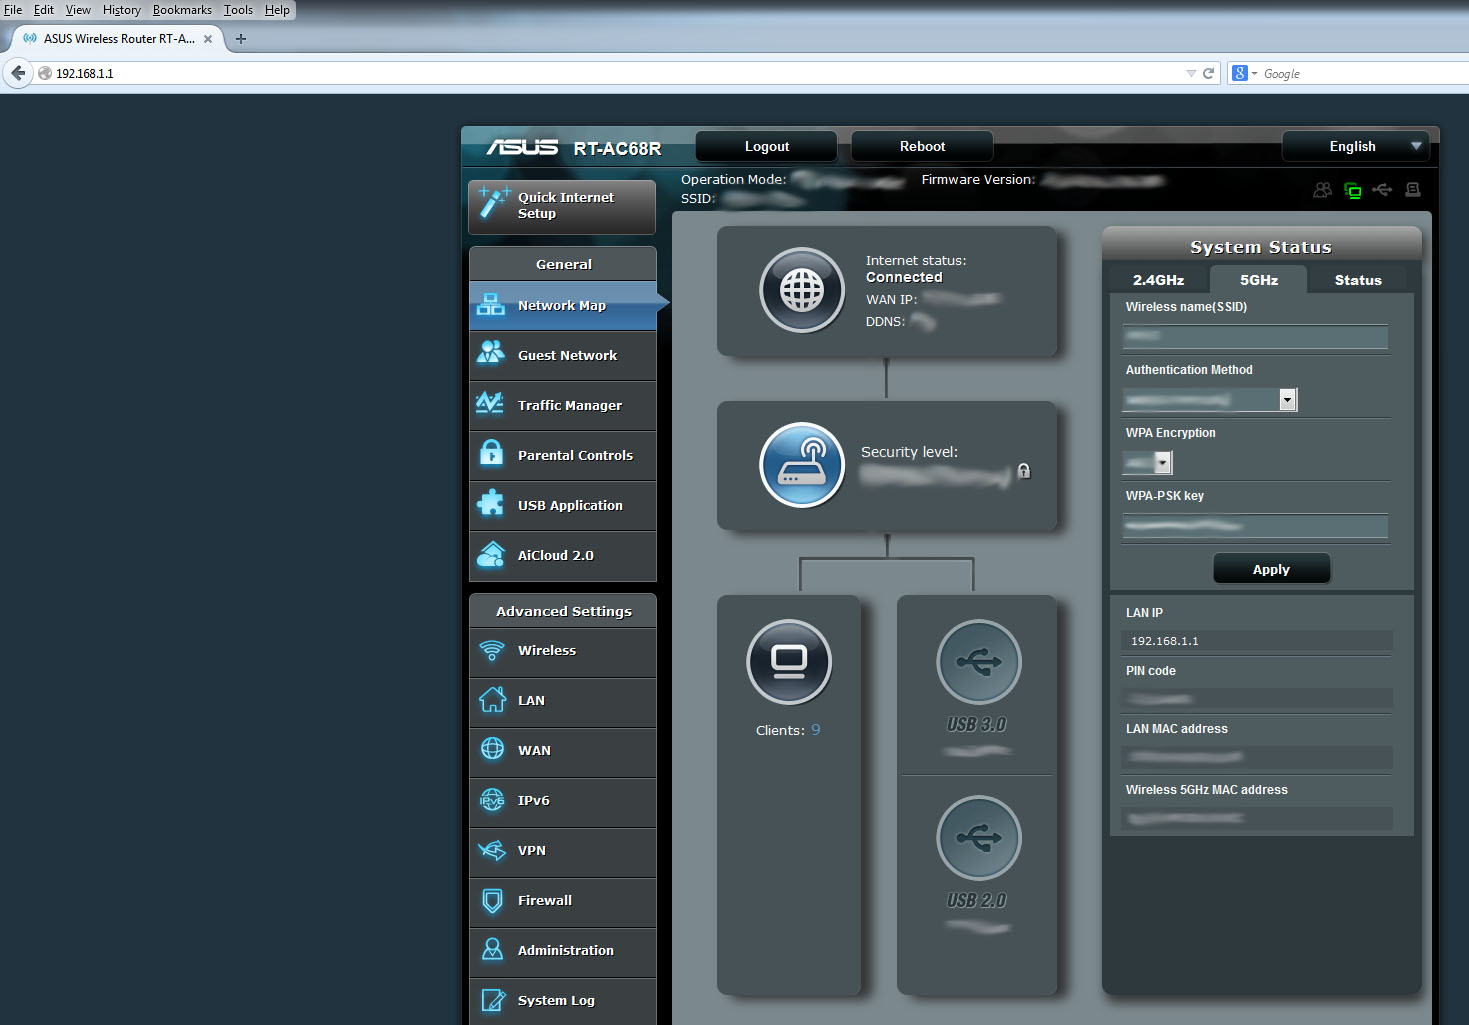
i was able to obtain the LAN client table by clicking the:

button, and based upon the client table:

I obtained, I was able to determine that my printers IP address was "192.168.1.96" (noting that I made this address static so it would not change in the future).
Conversely, upon obtaining this information, I returned to the second Add EpsonNet Print Port Wizard dialog and entered the printers IP address into the "Enter the printers host name or IP address." field:

noting that the port name was automatically generated, but can be changed if desired and the next button was pressed (via left clicking).
Likewise, upon pressing the next button, the Third Add EpsonNet Print Port Wizard Dialog will appear ( which is nothing more than a user approval summary):

and the finish button can be pressed (via left clicking).
Likewise, upon completion of this step, the "Printer Ports" dialog will remain and the:

close button can be pressed (via left clicking) in order to return to the Ports tab within the Printer Properties dialog.
Conversely, upon completion of this step, the following printer port:

should be selected within the Ports tab in the Printer Properties dialog (if not, you might want to consider canceling these changes and trying these steps again) and then the

apply button can be pressed (via left clicking) in order to apply the changes previously done.
Finally, upon completing this previous step, the:

close button can be pressed (via left clicking) and (hopefully) you should now be able to successfully print using this printer adapter (if not, chances are good you have another problem occurring and will have to sadly search elsewhere for a solution).
At any rate, hopefully this information proves beneficial in your quest to resolve this particular error message (noting that I myself had a heck of a time tracking down this particular variation of the problem); however, if not, I highly recommend that you try and isolate your problem as best as you can and then try searching the EPSON support forums for other possible solutions.
Good Luck!
By Mike Mclain